The 4th edition of the Small Museums Cataloguing Manual is now available online on the Museums Australia (Vic) website - http://www.mavic.asn.au/.
The manual is a guide to cataloguing object and image collections. The third edition of the catloguing manual was published in 1996 and although the information provided on cataloguing objects in particular was excellent it made little reference to the computer cataloguing of collections. The new edition assumes that computer catalogues are being created to record information about collection items.
There has been a substantial revision of the fields included in the 4th edition of the manual.
Sections provided in the new edition are:
Registration No
Object Name
Title
Description
Keywords
Inscriptions and Markings
Size
Makers Details
When Made
Where Made
When Used
Where Used
Acquisition Details
Condition
Storage Location
Current Location
Supplementary File
Restrictions
Notes
Cataloguer
A number of sections are no longer included in the new structure. The most notable field omitted from the new structure is classification.
When cataloguing objects I always recommend to societies that they follow the guidelines in the Small Museums Cataloguing Manual.
However when cataloguing items to be used specifically for information / research such as books, photographs, maps audio visual material, documents, ephemera, newspapers etc. some modifications to the structure make the cataloguing of these items easier to catalogue and to use.
Future posts will contain suggestions for cataloguing non object collections.
Friday, November 13, 2009

Wednesday, November 4, 2009
DB/TextWorks versions
The most recent version of DB/TextWorks is version 12 (2009).
Maxus website contains a list of the features added to each new version of DB/TextWorks from version 3 to the latest version. The first version of DB/TextWorks was version 2.
http://www.maxus.net.au/features.htm
Maxus website contains a list of the features added to each new version of DB/TextWorks from version 3 to the latest version. The first version of DB/TextWorks was version 2.
http://www.maxus.net.au/features.htm
Sunday, November 1, 2009
DB/TextWorks and Vista
Later versions of DB/TextWorks - versions 11 and 12 - should run on Vista with minimum problems.
The following posts may help.
Installation
Windows Vista users may need to right–click on the DBTextWorks exe file and select "Run as Administrator" to install the software.
How to Install Inmagic DB/TextWorks on Vista
http://www.andornot.com/about/developerblog/2007/06/how-to-install-inmagic-dbtextworks-on.aspx
Storing Files
A warning not to install database files in the Programs folder - set up a new folder for storing database files. This has always been the recommended practice but it is important to ensure that this is done when using Vista:
Inmagic DB/TextWorks and Vista Virtualization - http://www.andornot.com/blog/post/Inmagic-DBTextWorks-and-Vista-Virtualization.aspx
Help
Unfortunately the Help function does not automatically work in Vista. The following may rectify the problem.
Textbase Help Won't Work in Vista
http://www.andornot.com/about/developerblog/2007/04/textbase-help-won-launch-on-vista.aspx
Error Opening the .CHM Help File in Vista
http://support.inmagic.com/dbtw-wpd/exec/dbtwpub.dll?AC=GET_RECORD&XC=/dbtw-wpd/exec/dbtwpub.dll&BU=http%3A%2F%2Fsupport.inmagic.com%2Fsupbase3.htm&TN=kbase&SN=AUTO12261&SE=1262&RN=0&MR=20&TR=0&TX=1000&ES=0&CS=1&XP=&RF=Brief+by+TITLE&EF=&DF=Full+Article&RL=0&EL=0&DL=0&NP=2&ID=&MF=&MQ=&TI=0&DT=&ST=0&IR=585&NR=0&NB=0&SV=0&BG=&FG=&QS=&OEX=ISO-8859-1&OEH=ISO-8859-1
Compatibility Mode
In Vista older programs may run using XP Compatibility Mode. In theory if it worked in XP it should operate using this option.
Using Windows 7 or Vista Compatibilty Mode
http://www.howtogeek.com/howto/windows-vista/using-windows-vista-compatibility-mode/
The following posts may help.
Installation
Windows Vista users may need to right–click on the DBTextWorks exe file and select "Run as Administrator" to install the software.
How to Install Inmagic DB/TextWorks on Vista
http://www.andornot.com/about/developerblog/2007/06/how-to-install-inmagic-dbtextworks-on.aspx
Storing Files
A warning not to install database files in the Programs folder - set up a new folder for storing database files. This has always been the recommended practice but it is important to ensure that this is done when using Vista:
Inmagic DB/TextWorks and Vista Virtualization - http://www.andornot.com/blog/post/Inmagic-DBTextWorks-and-Vista-Virtualization.aspx
Help
Unfortunately the Help function does not automatically work in Vista. The following may rectify the problem.
Textbase Help Won't Work in Vista
http://www.andornot.com/about/developerblog/2007/04/textbase-help-won-launch-on-vista.aspx
Error Opening the .CHM Help File in Vista
http://support.inmagic.com/dbtw-wpd/exec/dbtwpub.dll?AC=GET_RECORD&XC=/dbtw-wpd/exec/dbtwpub.dll&BU=http%3A%2F%2Fsupport.inmagic.com%2Fsupbase3.htm&TN=kbase&SN=AUTO12261&SE=1262&RN=0&MR=20&TR=0&TX=1000&ES=0&CS=1&XP=&RF=Brief+by+TITLE&EF=&DF=Full+Article&RL=0&EL=0&DL=0&NP=2&ID=&MF=&MQ=&TI=0&DT=&ST=0&IR=585&NR=0&NB=0&SV=0&BG=&FG=&QS=&OEX=ISO-8859-1&OEH=ISO-8859-1
Compatibility Mode
In Vista older programs may run using XP Compatibility Mode. In theory if it worked in XP it should operate using this option.
Using Windows 7 or Vista Compatibilty Mode
http://www.howtogeek.com/howto/windows-vista/using-windows-vista-compatibility-mode/
Monday, August 3, 2009
Classification
Classification is simply grouping similar items together.
A simple form of Classification of Information items would be keeping books and reports in one place, keeping photographs together, storing all maps in the map cabinet etc.
Anyone who uses a public library in Victoria will be aware of the Dewey Decimal Classification system used for cataloguing books. More than a century ago Dewey divided knowledge, as known then, into 10 broad subjects including Religion - 200, Language - 400, Science - 500, Literature - 800, History - 900 etc.
Each broad category was then subdivided into 10 sections. For example in Science, Mathematics - 510-519, Astronomy - 520s, Physics - 530s, Chemistry - 540s etc.
Each of these branches of Science was then subdivided into 10 sections. For example in Mathematics, Algebra - 512, Arithmetic - 513, Geometry - 516 etc.
Each subject can be subdivided by ten as required. The result is the longer the number - the more specific the subject; the shorter the number - the broader the subject.
A brief introduction to the Dewey Decimal Classification System
Objects
Many museums in Victoria use the classification system provided with the Small Museums Cataloguing Manual. This system divides objects into Primary Categories and Secondary Categories. An example would be Photography as a Primary Classification with Photographs as a Secondary Classification. This classification works well for objects but not so well for Information items. When cataloguing objects use this classification which is often included as a validation list in the Museums data structure available for some computer programs including DB/TextWorks.
Information items
For Information items - books, photographs, maps, vertical file items, documents, manuscripts, audio visual items etc - the Museums data structure is too restrictive - 1000 photographs with the same classification (Photography - photographs) is not particularly helpful.
Some societies decide not to use classification at all but most do. Some use classification for some groups of items but not others. If, for example, all the photographs are stored in filing cabinets according to their accession (or registration) number classification would not be used.
For items stored in folders in filing cabinets where each folder has a heading, societies usually use the heading on the folder as the classification eg Sunshine Primary School, Houses, Chandler family etc.
Creating a classification system for books
For books, some societies including the RHSV which has a large comprehensive collection use Dewey Classification. However this is not recommended for a small local history collection as most of the books will have the same number eg 994.51 if the society is in a suburb of Melbourne.
Groups can create their own classification relevant to their collection. One way of doing this is to put all the books on a table and sort them into groups - books on schools, churches, cemeteries, industry, sport, families etc and then gave each set of books a number (or if you prefer, a letter of the alphabet)- 1,2,3 or A,B,C etc representing each major subject grouping. If subdivisions within a subject are required, letters of the alphabet (or numbers) can be used for each subdivision - eg if 2 is used for government and the society has a number of books on this subject, 2A might be used for books relating to federal government; 2B might be used for books relating to State government while 2C could be used for books relating to local government.
A sample Classification List for local history collections could be:
13. General
13A. Suburb / Town 1
13B. Suburb / Town 2 etc
The above is just an example only and would be varied according to the collection. Categories can be removed. Additional categories can be added as required. The important thing is to remember why you are classifying the books - to group books on the same topic together making it easier to locate items and therefore making the collection easier to use. If you have a large number of books on one topic then subdivide the category. If you have, and are likely to have, only one or two books on a topic you might decide to combine topics if it is logical to do so - otherwise just leave the one or two books in the category.
The basic principle is to make whatever classification system that you choose work for your collection.
A simple form of Classification of Information items would be keeping books and reports in one place, keeping photographs together, storing all maps in the map cabinet etc.
Anyone who uses a public library in Victoria will be aware of the Dewey Decimal Classification system used for cataloguing books. More than a century ago Dewey divided knowledge, as known then, into 10 broad subjects including Religion - 200, Language - 400, Science - 500, Literature - 800, History - 900 etc.
Each broad category was then subdivided into 10 sections. For example in Science, Mathematics - 510-519, Astronomy - 520s, Physics - 530s, Chemistry - 540s etc.
Each of these branches of Science was then subdivided into 10 sections. For example in Mathematics, Algebra - 512, Arithmetic - 513, Geometry - 516 etc.
Each subject can be subdivided by ten as required. The result is the longer the number - the more specific the subject; the shorter the number - the broader the subject.
A brief introduction to the Dewey Decimal Classification System
Objects
Many museums in Victoria use the classification system provided with the Small Museums Cataloguing Manual. This system divides objects into Primary Categories and Secondary Categories. An example would be Photography as a Primary Classification with Photographs as a Secondary Classification. This classification works well for objects but not so well for Information items. When cataloguing objects use this classification which is often included as a validation list in the Museums data structure available for some computer programs including DB/TextWorks.
Information items
For Information items - books, photographs, maps, vertical file items, documents, manuscripts, audio visual items etc - the Museums data structure is too restrictive - 1000 photographs with the same classification (Photography - photographs) is not particularly helpful.
Some societies decide not to use classification at all but most do. Some use classification for some groups of items but not others. If, for example, all the photographs are stored in filing cabinets according to their accession (or registration) number classification would not be used.
For items stored in folders in filing cabinets where each folder has a heading, societies usually use the heading on the folder as the classification eg Sunshine Primary School, Houses, Chandler family etc.
Creating a classification system for books
For books, some societies including the RHSV which has a large comprehensive collection use Dewey Classification. However this is not recommended for a small local history collection as most of the books will have the same number eg 994.51 if the society is in a suburb of Melbourne.
Groups can create their own classification relevant to their collection. One way of doing this is to put all the books on a table and sort them into groups - books on schools, churches, cemeteries, industry, sport, families etc and then gave each set of books a number (or if you prefer, a letter of the alphabet)- 1,2,3 or A,B,C etc representing each major subject grouping. If subdivisions within a subject are required, letters of the alphabet (or numbers) can be used for each subdivision - eg if 2 is used for government and the society has a number of books on this subject, 2A might be used for books relating to federal government; 2B might be used for books relating to State government while 2C could be used for books relating to local government.
A sample Classification List for local history collections could be:
- General works (encyclopaedias, dictionaries, directories)
- Government
- Collection Management and Managing the Organisation
- Schools
- Churches
- Cemeteries
- Agriculture
- Industries
- Sport
- Home Life
- Health and Medicine, Hospitals
- Ethnic groups
- Local Histories*
- Family Histories (then filed alphabetically by surname)
- History (other localities, history of Victoria, Australia etc)
- Transport
- Essential Services (police, SES, CFA)
- Communication (postal services, newspapers, radio stations)
- Arts, Music etc
- Hotels
13. General
13A. Suburb / Town 1
13B. Suburb / Town 2 etc
The above is just an example only and would be varied according to the collection. Categories can be removed. Additional categories can be added as required. The important thing is to remember why you are classifying the books - to group books on the same topic together making it easier to locate items and therefore making the collection easier to use. If you have a large number of books on one topic then subdivide the category. If you have, and are likely to have, only one or two books on a topic you might decide to combine topics if it is logical to do so - otherwise just leave the one or two books in the category.
The basic principle is to make whatever classification system that you choose work for your collection.
Sunday, July 26, 2009
Linking to audio file from database record - method 2
Earlier posts showed a method of creating a html page containing links to audio files in a folder on the computer and linking this file to a record in DB / TextWorks.
There is another way to create a link from the database record to an audio file on a computer so that when the link in the display form is clicked the audio file will play automatically. This method uses the UNC path to link to audio files and video files.
The initials UNC stand for Uniform Naming Convention. Instead of describing the location of a file or directory by drive letter, the Network Group will use a UNC path to describe the actual location of a file or directory. A UNC path is specific and applies to all operating systems.
Step 1
Locate the folder containing the audio files on the computer using My Computer or My Documents
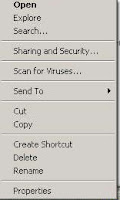 Click the folder using the right button on the mouse
Click Sharing and Security
In Network Sharing and Security section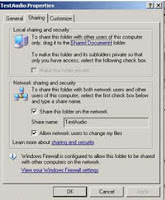
(Even though the computer may be stand alone this needs to be done)
Tick Share this folder on the network box
Enter the name of the folder to be shared eg TestAudio
Tick Allow network users to share my files
Click OK
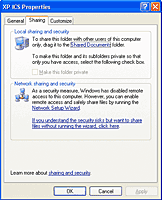
NB If the above options are not available and the screen looks like the one on the left, click the link in this section for information about understanding the risks of file sharing to enable this function.
If you only want to enable file sharing just choose the file sharing option instead of the Network Setup Wizard.
Once the sharing of files has been enabled repeat the above steps to enable the contents of the folder to be shared.
See How to configure file sharing on a Windows XP computer
To locate the computer name:
NB: This method was tested using the Windows XP operating system.
There is another way to create a link from the database record to an audio file on a computer so that when the link in the display form is clicked the audio file will play automatically. This method uses the UNC path to link to audio files and video files.
The initials UNC stand for Uniform Naming Convention. Instead of describing the location of a file or directory by drive letter, the Network Group will use a UNC path to describe the actual location of a file or directory. A UNC path is specific and applies to all operating systems.
Step 1
Locate the folder containing the audio files on the computer using My Computer or My Documents
 Click the folder using the right button on the mouse
Click Sharing and Security
In Network Sharing and Security section

(Even though the computer may be stand alone this needs to be done)
Tick Share this folder on the network box
Enter the name of the folder to be shared eg TestAudio
Tick Allow network users to share my files
Click OK

NB If the above options are not available and the screen looks like the one on the left, click the link in this section for information about understanding the risks of file sharing to enable this function.
If you only want to enable file sharing just choose the file sharing option instead of the Network Setup Wizard.
Once the sharing of files has been enabled repeat the above steps to enable the contents of the folder to be shared.
See How to configure file sharing on a Windows XP computer
Step 2
Either create a database for audio files or add an additional field to the data structure in an existing database to contain the UNC path.- When entering the filename in the record, the syntax to use is:
- Make sure that the field with the link appears in the Display report form.
- To listen to the audio file, click the link in the Display report form.
To locate the computer name:
- Locate the My Computer icon
- Click the My Computer icon using the right button on the mouse
- Click Properties
- Select Computer Name tab
To locate the exact UNC path for the folder:
- Click My Computer icon
- Click the My Network Places Link
- Click the required folder using the right button on the mouse
- Click Properties
NB: This method was tested using the Windows XP operating system.
Saturday, July 11, 2009
Linking to an audio file
A request was made at an Inmagic Museum Users Group meeting about the ability to play an oral history audio file directly from a link in a database record.
This can be done by following the steps in the previous post, Linking to files from database record, and linking to a html file stored in the same folder as the audio files are stored. The html file would either contain information about a particular audio file including the code- a href="nameaudiofile.mp3" Play audio file followed by /a or contain a list of audio files with the code linking to the audio file for each item.
The link provided would look like Play audio file
An example page for a list of audio files might be
Ron Smith recounts memories of attending Smithville Primary School during the 1930s
Play audio file
Ellen Brown recounts her days as postmistress in Smithville
Play audio file
NB links in above section are not functional links
When the html page and the audio file are in the same folder or the path to the audio file is included if in a different folder, clicking on the link will start the playing of the audio file.
Example of sample code for html page
NB. The above will only work if
1. there is a built in media player on the computer and
2. there is an internet browser installed (there does not have to be an internet connection).
This can be done by following the steps in the previous post, Linking to files from database record, and linking to a html file stored in the same folder as the audio files are stored. The html file would either contain information about a particular audio file including the code
The link provided would look like Play audio file
An example page for a list of audio files might be
Ron Smith recounts memories of attending Smithville Primary School during the 1930s
Play audio file
Ellen Brown recounts her days as postmistress in Smithville
Play audio file
NB links in above section are not functional links
When the html page and the audio file are in the same folder or the path to the audio file is included if in a different folder, clicking on the link will start the playing of the audio file.
Example of sample code for html page
NB. The above will only work if
1. there is a built in media player on the computer and
2. there is an internet browser installed (there does not have to be an internet connection).
Linking to files from database record
This example is using a DB/TextWorks database but there should be ways to also do this in other databases.
As well as being able to link database records to images, DB/TextWorks has the ability to link from a field in a database to another file such as a word document, spreadsheet, html file etc.
A number of steps are required:
1. To activate the facility to create the link
Open DB/TextWorks and go to the Tools menu then select Options and then Display.
Tick the box Detect URLs, EMail links, etc. and convert to hypertext links then click OK
2. A field needs to be added to the database to include the link directly to a word document, spreadsheet, pdf , html file etc which will open in a new window.
In the data structure include a field called (for example) File Name. It is a normal text field.
Go to the Maintain menu, select Edit Textbase Structure then Edit Fields
Type the name of the new field (for example) File Name and then click Add. Use the Close button to close the box and then OK.
3. If basic forms are not being used it will be necessary to alter edit and display forms to include the new field.
Go to the Display menu and then select Design form. Choose the form to be altered.
Click Add form box icon, select the name of the required field (for example) Field Name and then click the Add button
When designing the Display report form added text is required
Display - Form Designer - click required field eg Field Name - Tools - Box Properties - Format - Added Text - In the Beginning text box type file:// then click Apply
5. In the Edit form, if linking to an item is required, put in the full path to locate the item - C:\database\test.doc
6. View the record in the display form.
The result is that the display report form then allows the inclusion of a link to the required document in a new window.
The Maxus website contains a technical tip providing information on Live Hypertext Links in DB/TextWorks which also refers to linking to documents etc.
As well as being able to link database records to images, DB/TextWorks has the ability to link from a field in a database to another file such as a word document, spreadsheet, html file etc.
A number of steps are required:
1. To activate the facility to create the link
Open DB/TextWorks and go to the Tools menu then select Options and then Display.
Tick the box Detect URLs, EMail links, etc. and convert to hypertext links then click OK
2. A field needs to be added to the database to include the link directly to a word document, spreadsheet, pdf , html file etc which will open in a new window.
In the data structure include a field called (for example) File Name. It is a normal text field.
Go to the Maintain menu, select Edit Textbase Structure then Edit Fields
Type the name of the new field (for example) File Name and then click Add. Use the Close button to close the box and then OK.
3. If basic forms are not being used it will be necessary to alter edit and display forms to include the new field.
Go to the Display menu and then select Design form. Choose the form to be altered.
Click Add form box icon, select the name of the required field (for example) Field Name and then click the Add button
When designing the Display report form added text is required
Display - Form Designer - click required field eg Field Name - Tools - Box Properties - Format - Added Text - In the Beginning text box type file:// then click Apply
5. In the Edit form, if linking to an item is required, put in the full path to locate the item - C:\database\test.doc
6. View the record in the display form.
The result is that the display report form then allows the inclusion of a link to the required document in a new window.
The Maxus website contains a technical tip providing information on Live Hypertext Links in DB/TextWorks which also refers to linking to documents etc.
Subscribe to:
Posts (Atom)